Saturday, May 14, 2011

Candles

Okay, so if your like me you probably have a bunch of half burnt or almost all the way burnt candles lying around, not to mention broken ones. So why not use them?

This doesn't take much time and can even be fun.

First thing first, you'll need a few things:

Old Candles, bits of wax even those wax melts work

Candles jars, Mason Jars work to!

Candle wick and ends.. check out ebay for good prices on bulk.

Something thin like a skewer to go across the candle jar top to hold wick straight

Tape

Basically  the night before put any candles that you can't get loose from their jars into the freezer. The next day they should pop out easily. If the jar is a funny shape you might have to take a knife or screw driver and break it into pieces in the jar.. save jar you can reuse it.


Place all pieces into a pot ( you can leave the wick and metal piece they will be easy to scoop out later.

Melt on low heat in a big pot until melted. Add any scent or coloring ( we had half a purple candle in ours so it turned everything lavender)

Take wick and measure and cut to fit in jar with a little over hang

Place melted clippy (if you can't get the wick though, dip wick in wax and wait a second then it should slip right through with out separating the wick strands.

Place in jar, wrap around skewer

Pour in wax

Let cool!

One still hot the other half way cooled

Candles and wick

Jelly Jar candles

Votive candle

The top of a poured candle

Enjoy your candles. We love having these around for emergency's and I get more for my money on the wax melts we buy to scent the house!

Our Garden

I haven't really posted many pictures of our Garden. Part of that was due to a lack of camera last year. But I have some of what's going on now. :)

Mushrooms popping up thanks to all the rain

Strawberrys in full bloom


I'm not sure what his is. It's very invasiv and we can't seem to kill it off!

Potatoes popping up in three diffrent places!


This was planted 3 years ago at the original end to the garden. They never once grew... until now!


The front Rose Beds and one of the new Kitchen Gardens this is the all onion bed

this is the next area

Add caption

Longways down the fron Rose and Kitchen beds


This is in our "Canning" Garden. One of the 3 raised beds. Rose helped transplant the Strawberries out of here. This will now have tomatoes in it.


Potato Buckets new this year at the edge of the "Canning Garden"


More of the front


Kyera helping out.
So that's the first set of Garden photos I hope to post more and maybe even the drawings Corey made up of the layout of our Gadens.

Rain Barrel Excitement!

First I want to say thank you again to Jan @ Thanks For Today for her Sustainable living project. You can follow the link and read more about it. It was so much fun to join in and read about what everyone else is doing to help the environment and work towards self sustainability. There are people at so many different stages.

Other then a TON of inspiration, I ended up winning the grand prize ( I never win anything!). I Fisker's Rain Barrel. I posted last year pictures and instructions for our homemade rain barrel and we use it a lot! So to have an actual one we thought would be interesting.

It installed a little harder then the homemade one. You have to cut the pipe and get the black diverter squeezed on to the pipe and then the other end goes to the bottom of it. Honestly though the hardest part was getting the lid all the way on. I had to squeeze and bend in order to get it on fully. Otherwise everything else worked really well. Just make sure you have spade bits and a hacksaw around. We have these on hand but I know a lot of people don't.


It's rained since installing and works wonderfully!! My husband is in love already because we can now fully water both sides of our front gardens. This saves us from running a ton of hose all over the yard. We don't have to worry that someone left the hose on and the water is still running, and our bill will be sky high. We will only have to pay to water the canning garden this year. I figure this will save us at least $15 a month. Not to mention saving mom from tripping over hose's :)

My worst nightmare is now my favorite thing!

I will be the first to admit I have always HATED LAUNDRY!! I'm sure you can see my tag on my blog stating that I blog to keep from doing the laundry.. to true!

In my house you never know which person is going to have a skin reaction to a certain laundry product. We can go months and then suddenly boom! Can't use the 2 big containers of soap any more someone broke out in a rash. So it always feels like when is the bottom going to fall?

Then no matter what we used I could always smell a little sour smell. I'm sure it's probably do to our water but it really annoyed me. It's like the soap was masking the sour water smell. 

Add to that the loading unloading and folding and ugh. GO through all that for laundry that didn't smell clean..

Well, these last 2 weeks it's all changed! I love my laundry and can't wait to do it.. granted I'll be glad when there's less of it.. but wow.

The first thing i started doing was making my own laundry soap. It's not hard...

I take a few bars of our homemade Cold Process soap that is not overly supper fatted. ( why waste oils and moisturizing soap on the laundry?


Grate this and put in a container then mix in enough washing soda to cover the shreds so they no longer stick together ( I have used baking soda also with good results) Cool thing to the kids can help!

Add about 1/4 to 1/2 cup to your wash.. that's it.

You can add up to 1/2 cup of white vinegar if you need softener
 ( I looked at our softener the other day.. OMG the first ingredient was sugar, then clay, then dye, then fragrance) WOW  maybe I'll just throw some sugar in the wash :)

*Note* You can add Borax if you feel you need it. We don't because we try and use our laundry water in the garden and the Borax can build up and become toxic.

The second change for us was a laundry line. Yeppers, the girl who hated dong this growing up is now doing it willingly as an adult.. who'd of thunk?  I'll have to do a post on my clothes pin bag made from recycled jeans later this week. 

The kids had to get in on the action.. hope this continues!

Colty had to help!

So proud of his wash cloth!

Now our clothes smell nice (the sour smell is gone) and we are saving money not to mention the kids want to help. And I can still pin laundry up 2 items to a clothes pin just like when I was a kid :) Some things you never forget.

Thursday, May 5, 2011

Aquaponics Tables

We've had our Aquaponics Beds on folding tables since we started them a few months ago and they were working great. However 2 days ago my husband noticed that the table was dipping in the middle. This was due to the weight and probably some water damage from a bed that had slowly leaked one night when I was gone.

Well with 200 lbs of rock, water, and my seedlings all at risk Corey new he had to do something and fast. So we sat down and talked about what I needed when it came to the beds. One of the things I had learned is I need to be able to get around all the long sides. It was really hard to replant when I drained the tanks. Because I'm short and couldn't reach the backs of the doubled up tanks.

So we took some measurements and came up with these tank stands. I will be loosing my small bed for a while, which is okay until I starts seeds again next year.


The other goal in this room will be to set up a seed starting area instead of the wobbly book shelf :)

So here are some pictures of the 1st 2 of the 6 bed tables we have to make. We hope to have at least 3 done this week. They are made of a mix of wood we had either given to us, or left from other projects. We will have to buy 1 4x4x8 because we are out of them. So our total out of pocket cost will only be $6.00 and we get our folding tables back :) Not to mention the risk of a flood has been diverted!

Colty helping daddy
Main Base
Adding legs
Two down 4 more to go!


I will post picture of the room as soon as all 6 tables are made and in place. Then the next step will be figuring out a seed starting table :)

Weekend Garden happenings

We had a great weekend out here and really accomplished a lot! All of our Strawberries have been transplanted into the Rose beds in front of our house. Thanks to my daughter Rose! Between the 2 of us and a little help from hubby we moved over 100 Strawberry plants.


Corey, the kids and myself started working on the walkways in front of the house. Our goal eventually is to put in more brick walks with Irish Moss growing in between them. Right now though we had to do something because the Lawn Mower can't get between the boxes and beds and all of our hand me down Weed whackers are having issues and at a friends house for possible repair?


So Corey tilled up the soil, we laid a heavy layer of Newspaper (Thanks mom and dad!) and then a layer of Wood Chips! All the kids helped and we had a lot of fun, including rides in the wagon of course!


We were also able to get 2 more of the front beds filled ( I can't believe Rose filled this cart up all by herself!!)

And planted one of the beds with Leaf Lettuce, Carrots and Leeks.

I hope to plant the other bed here in a few days.

Check out some of the cool start ups around the Garden


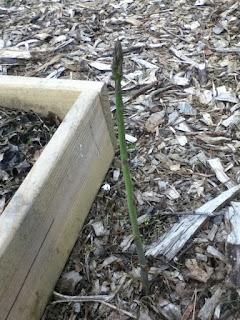
This Asparagus was planted 2 years ago at the original edge of the garden.. we never had even a hint of growth on these until now??


Potatoes  I guess we missed a few again. oops!
We really have a blast doing this as a family! The time flys by so fast!